Adding Custom Hardware Peripherals.
All peripheral/non-scanned hardware needs to be recorded in order to maintain an accurate asset log. DNA enables you to manually associate details of these components with their respective 'owners'. Devices can be associated to individual PCs or to groups.
1. You can add a peripheral device when creating a new 'non-scanned' hardware record.
or
To associate the device with an existing item in the Tree view, rightclick on a Client, department, AD container, dynamic group or the Company and select Peripherals.
or
Click the Hardware icon drop down arrow and select {Peripherals} from the menu.
or
Click the Peripherals icon in the Hardware Inventory group.
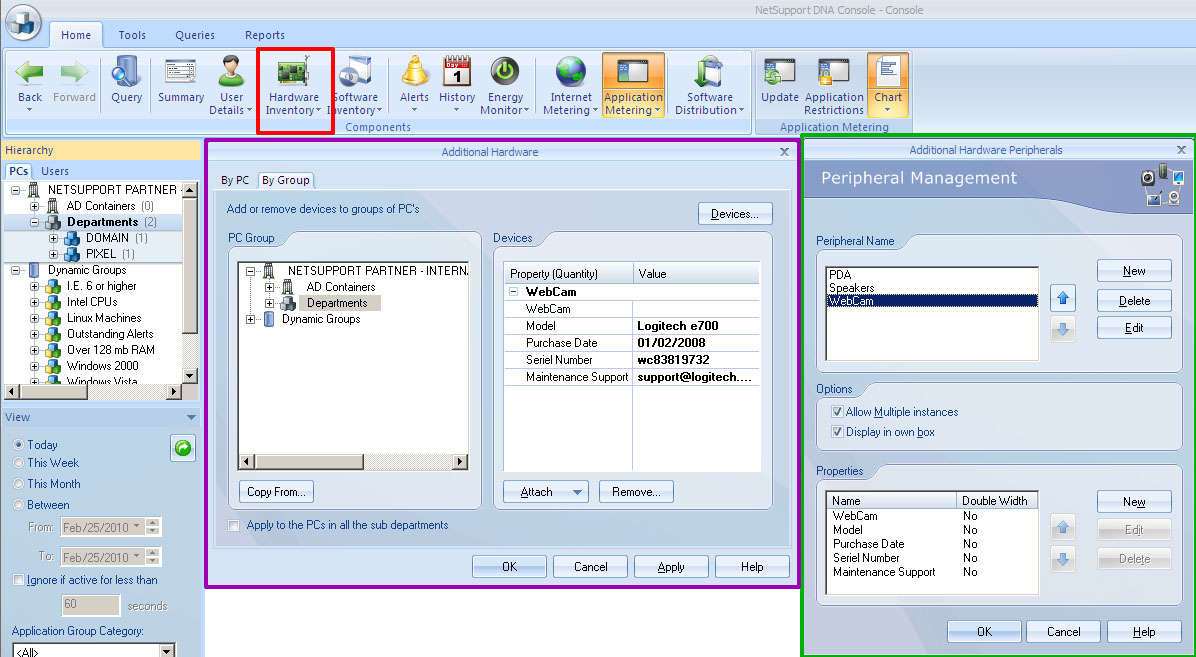
Add Peripherals by PC
1. Select the By PC tab and in the Tree view select the PC to associate the hardware with.
2. Click Devices to create a new device, once created the device will be displayed in the Attach drop down list. Select the required device from the list to associate with the PC.
3. Enter the device values, for example the specific make/model of the device, that will be listed on the Hardware Inventory.
4. Click Apply.
5. Devices can be copied from one PC to another, click Copy From and select the PC to take the data from, all devices attached to that PC will be copied over.
6. You can add further devices by repeating the process or click OK when complete. To remove an item currently attached, select the required device and click Remove.
Add Peripherals By Group
1. Select the By Group tab and in the Tree view select the department or Dynamic Group to associate the hardware with.
Note: You can include all Clients within the selected department by checking Apply to the PCs in all the sub departments.
2. Click Devices to create a new device, once created the device will be displayed in the Attach drop down list. Select the required device from the list to associate with the PC.
3. Enter the device values, for example the specific make/model of the device, that will be listed on the Hardware Inventory.
4. Click Apply.
5. Devices can be copied from one group to another, click Copy From and select the group to take the data from, all devices attached to that group will be copied over.
6. You can add further devices by repeating the process or click OK when complete.
7. To remove a device click Remove, select the group that the device is to be removed from and then select the required device, click OK.
The Device will be removed from all PCs in the selected group.
Additional Devices
Use this dialog to compile a register of non-scanned hardware devices along with their associated properties. Listed items can then be associated with Clients or Non-scanned peripheral equipment.
1. You can create a new device when adding peripheral equipment to an
existing record in the Tree view.
or
You can prepare a list of devices in advance, click the Hardware Inventory icon drop down arrow and select {Peripheral Management} from the menu. These can then be attached at a later date.
Peripheral Name
New
Click New to add a device to the list. The list can be sorted by clicking the arrows.
Edit
Change the name of an item in the list.
Delete
Removes the device from the list and from any hardware inventories that it may appear on.
Options
Allow Multiple instances
If checked, enables you to associate multiple instances of the device with a users inventory. For example, two digital cameras but with different make/model numbers.
Display in own box
If checked, each instance of the device will be listed in a new box on the hardware inventory page. However, if there are multiple instances of the same device you may prefer to group them together in the same box.
Properties
You can edit the properties of the new item and associate additional items with the device dependant on how much related information you need to record.
New
Associates additional items with the primary device. Click New and enter the device name. Depending on how much information will be entered you can provide a double width field. Click OK.
Use the arrow keys to arrange the devices into the order you want them displayed on the inventory page.
Edit
Enables you to edit the properties of a device.
Delete
Removes a device from the list and from any inventories that it may be attached to.
When all details are entered, click OK.